
I made a really sweet little book cover the other day and enjoyed the process and the results so much I thought I'd write a tutorial on it. And it's pouring with (much needed) rain outside so what a good way to spend a day, right?
 |
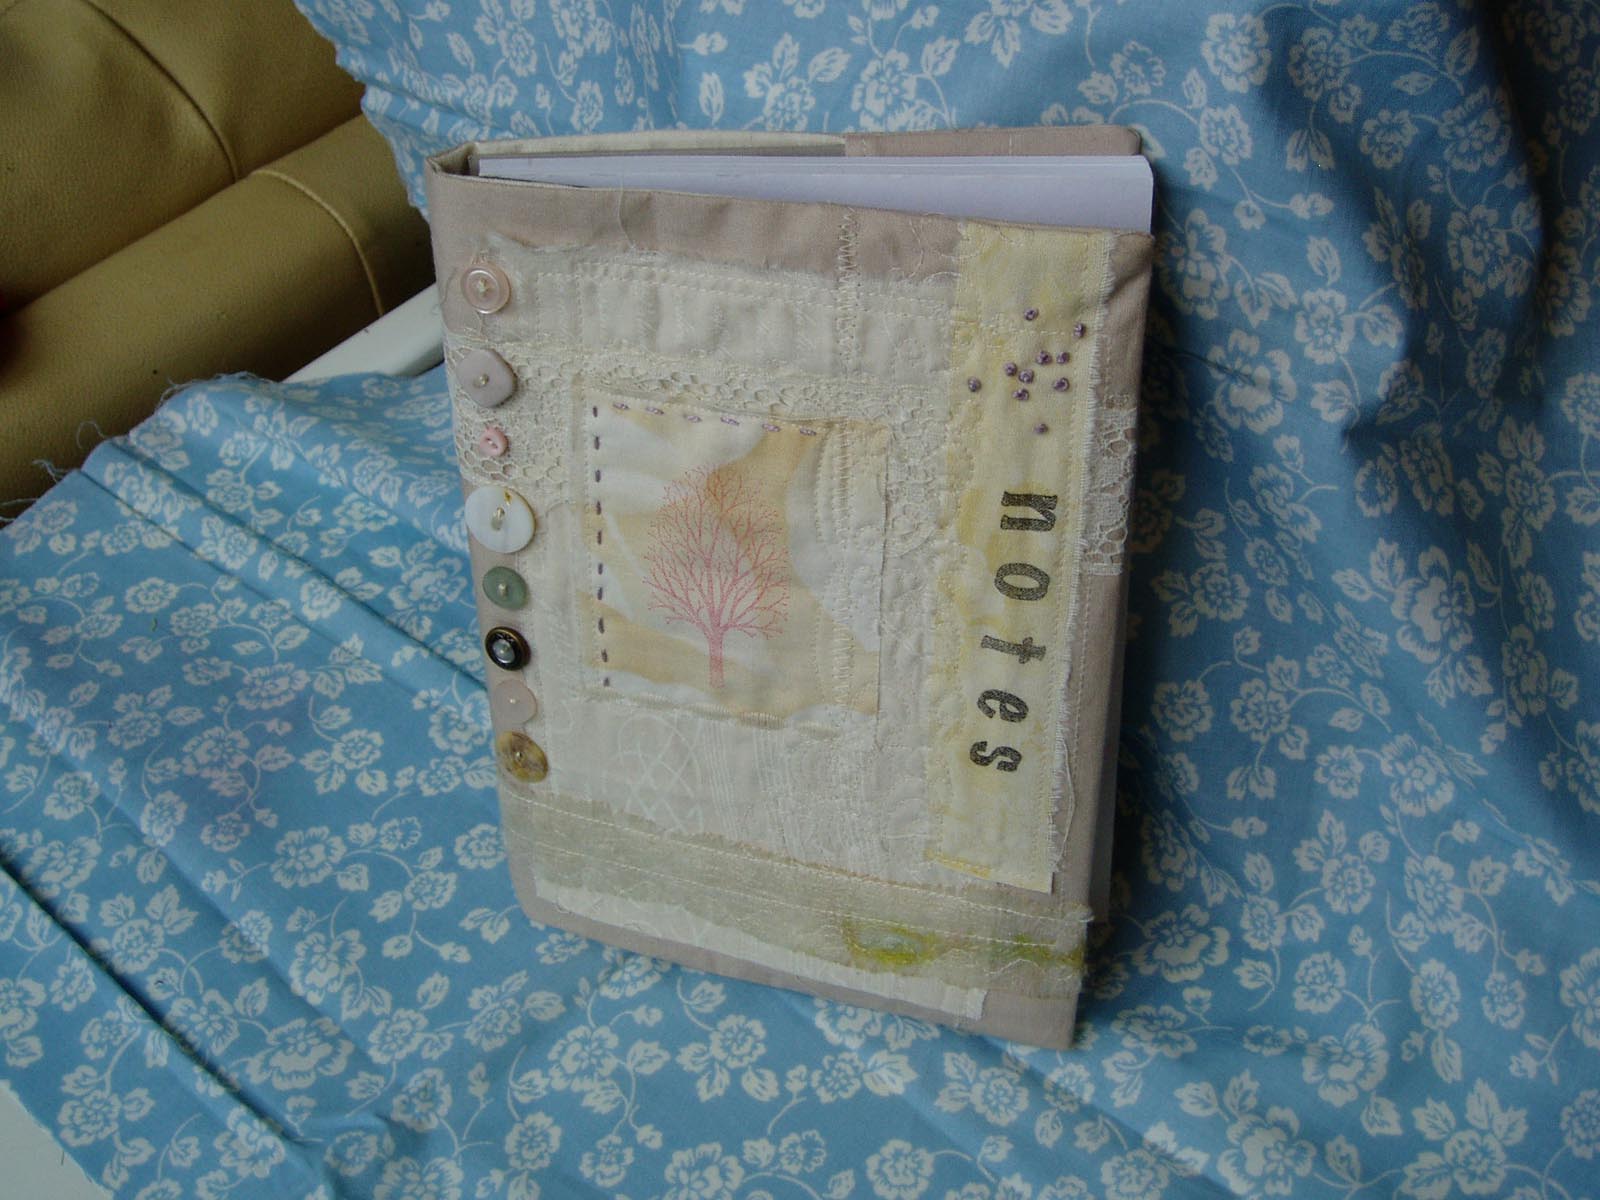
| Close-up of the cover. |
 |
| The back. Grubby window optional. |
 |
| The inside of the cover. |
At our Quilting Club's Christmas lunch the other day I received a little book covered with a lined cover and a cross stitch design on the outside. Now I can't cross stitch to save my life but I did love how this book cover was lined so I sat there with it unfolded and inside out and figured out how to sew one....and then I wrote it down real quick so I wouldn't forget. I don't know about you but my brain doesn't work inside out and unfolded so I was very proud of myself!
 |
| This is the wee cross-stitched book cover I received. |
You will need a book - any old book will do. I like to choose a standard size notebook so it's easily replaceable. The one I use in this tutorial is just a school exercise book.
Lay your book down on it’s spine and open. Measure from edge to edge (A) and top to bottom (B) and write these measurements down so when you’re interrupted by the kids you don’t have to start all over again.

Add about 8” to your edge-to-edge measurement. You’ll need this much for the hems, the fold in flaps that hold the cover on to the book and some ease when you shut the book.
Cut a piece of fabric for the outside of the cover A + 8” by B + 1”.
Cut a piece of fusible medium-weight non-woven interfacing A + 8” by B + 1”. If you don’t have fusible medium-weight interfacing – use something else! Calico would do. It’s just to add a stabilizer for when you embellish. I always have a couple of metres of it on hand because it’s cheap and very useful for things like this.
Cut a piece of fabric for the lining A by B +1” (you don’t need to add anything to A for hems as the edges are inside the flaps of the cover and don’t need to be hemmed).

Iron your interfacing to the wrong side of your cover fabric according to manufacturer’s instructions. (Optional: swear as your interfacing sticks to the unidentified goo on the bottom of your iron. Make your usual promise to yourself to always use a pressing cloth.)
Lay your book out flat on the right side of your cover fabric and mark your flaps and the center. This is so you know where your central collage motifs should go.

Now the fun bit! Collage and embellish to your heart’s content! Rummage in your scrap box, find some bits of lace, yarn, ribbon – use your imagination. I often lay things out to get an idea but I leave a lot of it to serendipity. Remember, the bottom layers will be obscured a lot so leave your central motifs to the last layers. This is a chance to use some of those fancy stitches on your sewing machine that you never use too. And a bit of couching. And if you don’t like something you sewed down, then no reverse sewing required – just cover it up with something else! Sew on a few buttons or beads and do a bit of hand embroidery as a final touch.
 |
| First layers. Blocking in some larger fabric shapes. |
 |
| Second layers. Couching in some fuzzy yarn and ribbon. |
 |
| Third layers. The main collage elements. I also hand stitched on some buttons and did a hand embroidery after this. |
Once you are happy with your collage, turn over a small hem on your short sides of your cover and stitch down.

Go and sort out the kids lunches and then remove the furry interloper from your work before continuing.

Then lay out your cover fabric right side up and fold over your flaps. Pin flaps down and then lay your book down over the cover. Close your book, holding your fabric as you do to see if you have enough ease. Thicker books need more ease.
Once you are happy with the amount of flap turn over, take your book away and lay your lining fabric down on top, wrong side up.
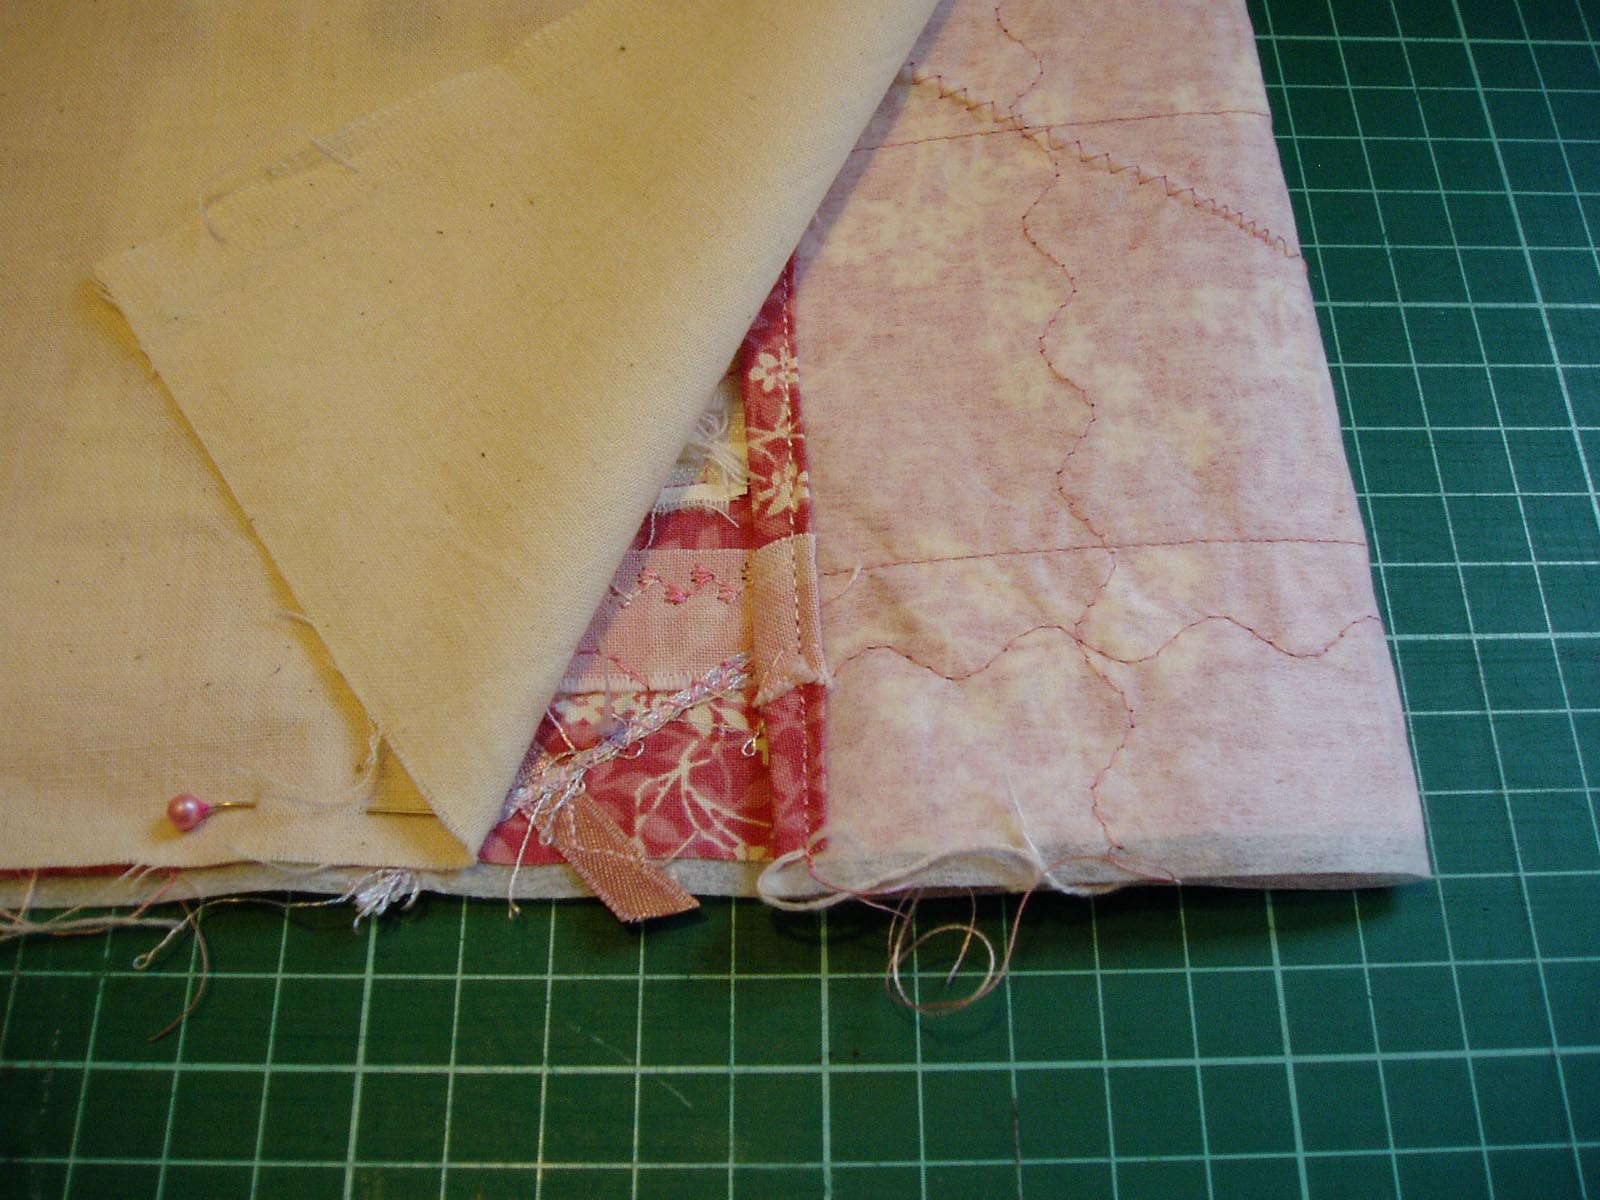
 |
| This layering bit is the only tricky part so I've included two photos so you get it right. Cover right side up with flaps turned in, then lining wrong side up on top of flaps - so cover and lining are right sides together - note to self: shouldn't have used calico so you could see wrong/right sides of lining! |
Sew down the two long sides with a quarter inch seam. (You can make this seam larger if you need to make the cover snugger, but book cover thickness and embellishment thickness can alter the seam allowance needed so start narrow, unless you love your unpicker!
Unfold your cover to the right side and press it gently to crisp up the corners.
*Edited to add a series of photos to demonstrate the turning process (especially for Suz!)
 Above you can see what it looks like after the long side seams are sewn, looking at the lining side.
 And if you peek in one end you can see the flaps and the right side of the cover.
 Then you turn it right side out and you get this. The right side of the cover but the flaps still need more turning.
 Here is one of the flaps turned over.
 And here is the other flap flipped over.
 Both flaps flipped over looking from the lining side now.
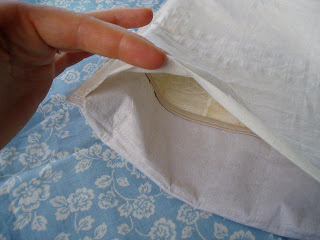
 And a peek under one of the flaps. I've pulled back the lining too so you can see the wrong side of the cover. The raw edge of the lining sits well under the flap so you don't need to hem it (you could if you were really keen!).
Slip it onto your book and admire! Adjust your seam width a little if need be. Then wrap it up and tick it off your Christmas present list.
*Edited to add a series of photos to demonstrate the turning process (especially for Suz!)


Slip it onto your book and admire! Adjust your seam width a little if need be. Then wrap it up and tick it off your Christmas present list.
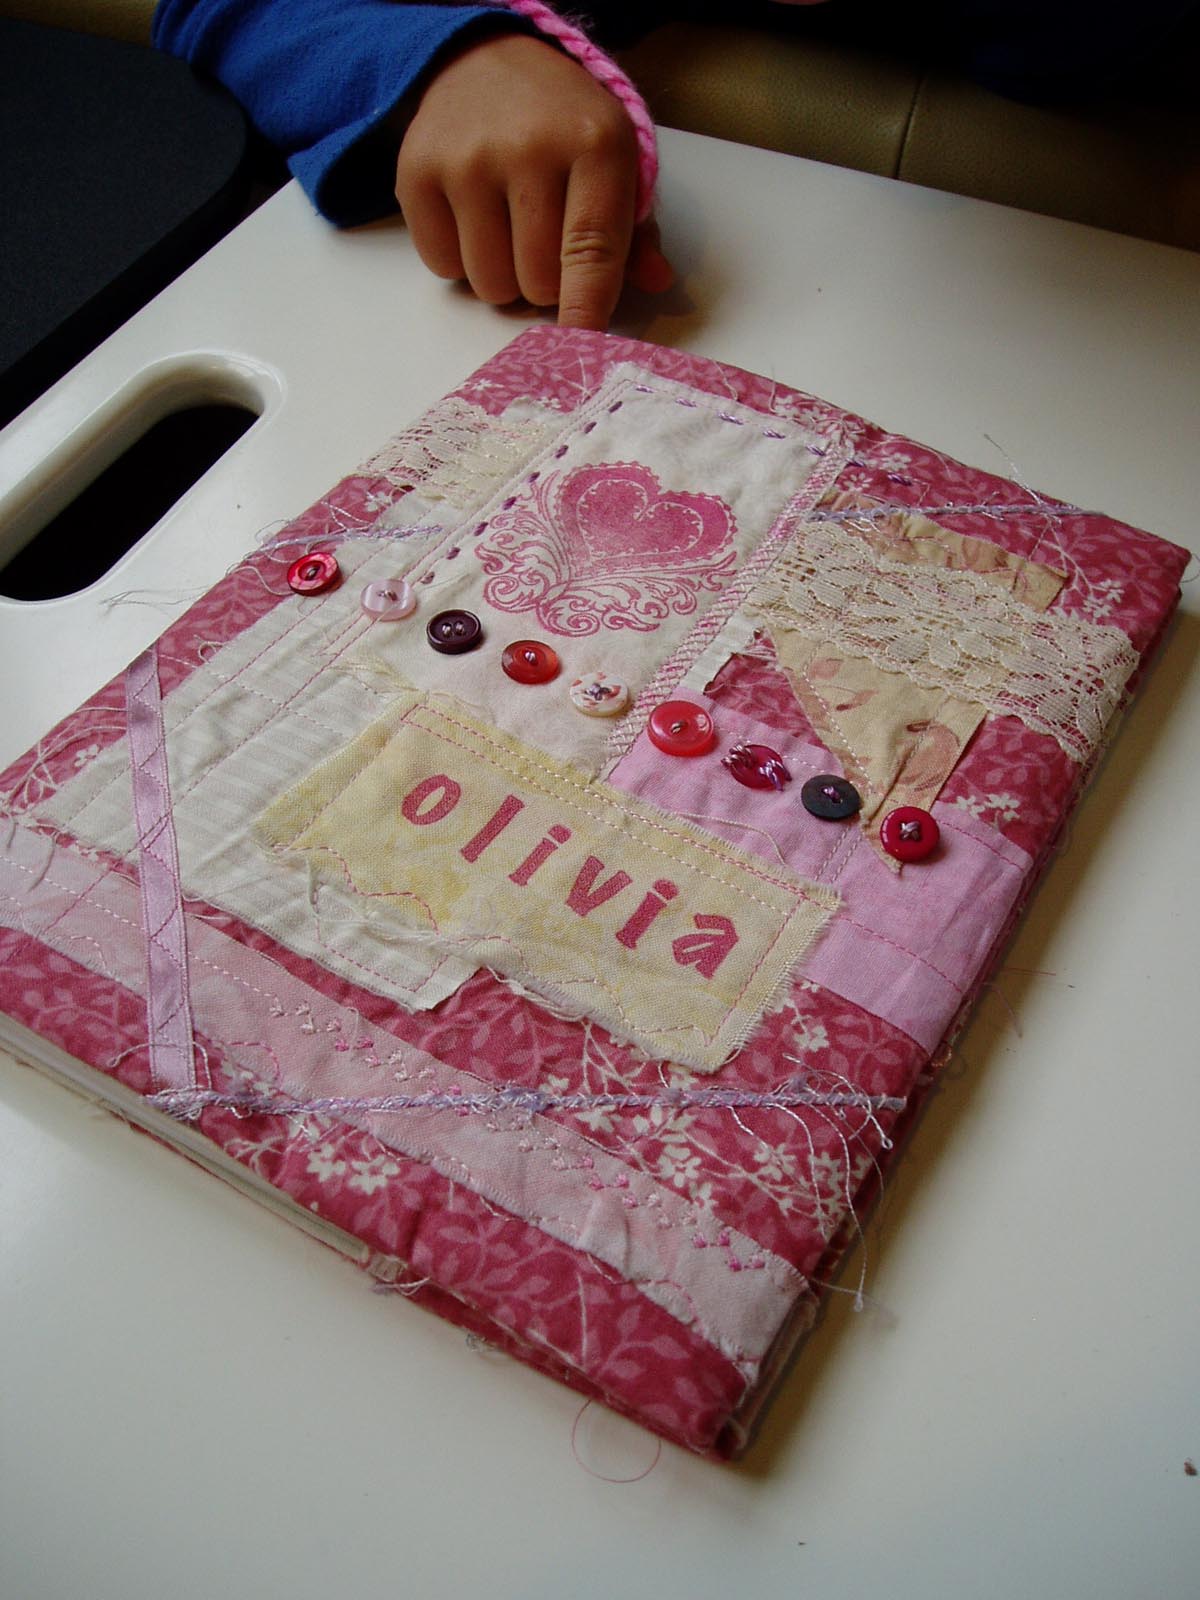 |
| I used craft stamps and heat settable ink to print the heart image and the name. |
 |
| Here's the back. The heart is a little collage made a while ago: lots of bits laid out, covered in tulle, free-motioned stitched and then cut out into a heart shape. |
 |
| Pretty cool, huh?! |
 |
| Close up. See the little tuck in the fabric in the top right? You don't notice little errors like this in the whole, slightly messy, collage type sewing, so don't get hung up on them. |
I had huge fun sewing these up and my son has already put in an order for one too. I'd love to see any that you do and I'd appreciate any feedback on how easy this tutorial was! Happy stitching!
great tutorial, love the humour in it too. :-)
ReplyDeletehaha...furry interloper LOL! Great tute Charlotte :0)
ReplyDeleteA very good way to spend a rainy day...I love what you've made!
Sorry, lost it at the end. Can you show a photo of the inside of the flap after you've turned it through (what happens to the loose short sides of the lining? Am I overthinking it... damn those bag instructions I can never work out...
ReplyDeletefantastic!! You must keep your 'helper' AKA...ironing board supervisor.
ReplyDeleteSo you have one of those too - the furry interloper I mean :) Mine has taken over my wool basket - permanently! I gave in and covered the wool with an old woolly jumper so now he is happy and my wool is (mostly) fine too if slightly squashed.
ReplyDeleteviv
ps I have a pdf of that pattern to send when I get your email :)
I love the third button from the right - and the tutorial is super and can be understood very well also for not "English mother tonguers" especially with the many photos. Thank you so much and it is a lovely bookcover.
ReplyDeleteWow, special attention!! Yes, Yes, I fully understand - the power of good photos! - THANKS. I may just have to make one of these... how far away is Xmas??
ReplyDeleteYou must have been reading my mind - just what I was after with Christmas on the way - and your method took away the need for binding which I had used before THANK YOU!!!
ReplyDeleteI have been looking everywhere for a tutorial to cover books. So nice to find someone who really knows how to connect with a quilter/seamstress. Off now to make some book covers and give the husband the good news....he will be doing the cooking to night. Thank you.
ReplyDeleteI made a book cover today and your instructions are just perfect!
ReplyDeleteIt's a great design. I can see me covering all sorts of books! Maybe not with the same level of detail that I put into this one. It was a special present. Check out the story here. http://layer-upon-layer.blogspot.com/2011/12/journal-cover.html
Thanks.
Rona
I LOVE this tutorial - thank you so much!
ReplyDeleteHi, I enjoyed your tutorial and made three books for teacher gifts over the weekend! Very happy!
ReplyDeletethanx alot for the great tutorial just finished very happy
ReplyDeleteThanks ever so much, it's lovely! !
ReplyDeleteThanks for this, I'll be sure to try it out myself - think a mother's day present maybe? ;)
ReplyDeletehttp://fairytaleprettypicture.co.uk
Ooooh, I need to make one of these!
ReplyDeleteI made one several years ago for one of my daughters before a big trip... I needed a " complete-able" quilting project ( lots of interlopers- the furry and the two legged sticky kind)- and this idea came back to mind.
ReplyDeleteGreat job, and thanks for the last explanation/s photographs for the less than spacially aware among us..
What an excellent tutorial. I am new to sewing and patchwork but I can follow every step of this tutorial. Photos are excellent. Thank you so much for sharing your talent with us and taking time out to write a fantastic tutorial. Aine
ReplyDeleteFabulous tute, I have been wanting to make these for ages!
ReplyDeleteThank you :) dressmaking fabric
Beautifully inspirational! From Australia!
ReplyDeleteFantastic tutorial - just what I was looking for. Needed cover for the new allotment book (book, not allotment!)so using up scraps of veggie & fruit fabric. Love the humour, keep up the excellent work. Liz from UK
ReplyDeleteBrilliant tutorial, just what I was looking for. Needed cover for new allotment book (book, not allotment!) and now using scraps of veggie & fruit pattern fabrics. Keep up the excellent work, love the gentle humour!
ReplyDeleteWow, this is just what I needed and funny too! Thank you :-)
ReplyDeleteThank you from Hawaii❤️🌴.
ReplyDeleteThank you from Hawaii ❤️🌴.
ReplyDeleteGreat tutorial! I wanted to let you know a cheap alternative to a pressing cloth. I use a sheet of parchment paper instead. You know the stuff you line baking sheets with? It's heat resistant and cheap it works great! :)
ReplyDeleteThis is such a great tutorial! I used your instructions and my book cover worked out perfectly :)
ReplyDeleteGreat tutorial. Thank you
ReplyDeleteGreat tutorial, thank you! May I add a hard-earned hint? DO be careful about your book/fabric selection, and make sure they match, or are complementary. The top and bottom edges of the book will show, inside the flaps. If you chose a brightly-flowered book (as I did) and wanted to cover it with light-colored fabric, you'll still see those bright flowers on the top and bottom edges. Also, the light-colored fabric, even with the liner, was not sufficient to conceal the flowery book. But all was not lost! I had also bought a similar-size plain tan book that only needed a few tweaks in the measurements, and I was done. Thank you!!
ReplyDeleteCharlotte! I first read your tutorial years ago and tucked it away in my bookmarks waiting for time and headspace to tackle it. I've finally given it a go et voila! Done. I had a panel I had been working on (also years ago) and it was not the right size but I just popped it on to a larger backing fabric and it worked a treat. Thank you for the great tutorial and photos. I also appreciate the humour in it (I can "hear" you as I read ;-) ) Can I post a photo here? How?
ReplyDelete